Touch
DECK CONTROLS

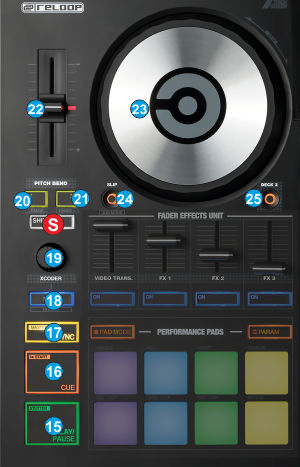
- PLAY/PAUSE. Plays / Pauses the track. Press and hold SHIFT and then press this button to play-sutter the track.
- CUE. When the Deck is paused, you can set a temporary Cue Point by moving the Platter to place the Audio Pointer at the
desired location and then pressing the Cue Button. During playback, you can press the Cue Button to return the track to this Cue Point. (If you did not set a Cue Point, then it will return to the beginning of the track.). If the Deck is paused, you can press and hold the Cue Button to play the track from the Temporary Cue Point. Releasing the Cue Button will return the track to the temporary Cue Point and pause it. To continue playback without returning to the Temporary Cue Point, press and hold the Cue Button, then press and hold the Play Button, and then release both buttons.
Press and hold SHIFT and then press this button to return to the beginning of the track. - SYNC. Press this button to automatically match the corresponding Deck's tempo with the opposite Deck's (or the Master Deck’s if using a 4 decks Skin) tempo and phase.
Hold SHIFT down and then press this button to set this deck as Master Deck. When a Deck is set as Master Deck, all other decks will sync to this deck. When SHIFT is held, the LED of the SYNC button will indicate the Master Deck. When the LED is flashing, the Master Deck is in manual mode. To return to the auto-mode selection, press the flashing SYNC button - XCODER MODE. Use this button to cycle through the 3 available modes for the XCODER. The mode is visible on the Touch screen GUI.
The LED of this button will be off when the Loop mode is selected, on when the Key mode is selected and blink when the CBG mode is selected.
Hold SHIFT down and then use this button to toggle between Single and Multi Effect modes. See Effects - XCODER.
In Loop mode (default) Use this encoder to half/double the size of the loop.
Push the encoder to enable/disable a Loop of the selected size in Beats
When a loop is triggered, hold SHIFT down and then use this encoder to move backwards/forwards the loop in time by 1 beat per click.
In Key mode. Use this encoder to adjust the Key of the track.
Push the encoder to reset the track to its original Key value.
Hold SHIFT down and then push the encoder to match the key of the track with the key of the opposite deck.
In CBG mode. Use this encoder to move the CBG (Constant Beat Grid) of the track in time
Hold SHIFT down and then use this encoder to adjust the width of the CBG (same as if adjusting the BPM).
Push the encoder to re-analyze the track and undo all CBG changes (resets CBG and BPM)
Hold SHIFT down and then push the encoder to set current track's position as First-Beat (this point will be steady when the width of the CBG is adjusted) - PITCH BEND LEFT. Hold this button down to temporary slow down the tempo of the playing track. When released, the track will continue playing at the tempo designated by the Pitch fader.
Hold SHIFT down and then use this button to select the previous available % range for the Pitch fader - PITCH BEND RIGHT. Hold this button down to temporary speed-up the tempo of the playing track. When released, the track will continue playing at the tempo designated by the Pitch fader.
Hold SHIFT down and then use this button to select the next available % range for the Pitch fader - PITCH. Controls the track's playback tempo.
When the LED is turned on, it indicates that the pitch fader of the unit is on zero (center) position and the track plays at its original speed. - JOGWHEEL. Touch sensitive platter for scratching (vinyl mode enabled), bending (CD Mode) or Seek mode. In Vinyl mode, use the jogwheel to scratch and the outer ring to bend.
Hold SHIFT down and then use the jogwheel to navigate through the track (seek mode) - SLIP. Use this button to enable/disable the Slip mode. When enabled, several functions such as scratching, hotcues and loops will act temporary and when finished, the track will resume playing from the position it would have been if those actions never took place.
Hold SHIFT down and then use this button to enable/disable Vinyl mode. - DECK SELECT. Switch Control for the Left decks (1 and 3) and Right Decks (2 and 4). Use the left-side DECK button to assign Deck 1 or Deck 3 (LED will be lit) to the left side of the Reloop Touch and the right-side DECK button to assign Deck 2 or Deck 4 (LED will be lit) to the right side of the unit.
Effects


