Reloop - Touch - Touch Display
SETTINGS VIEW

ELEMENT
DESCRIPTION
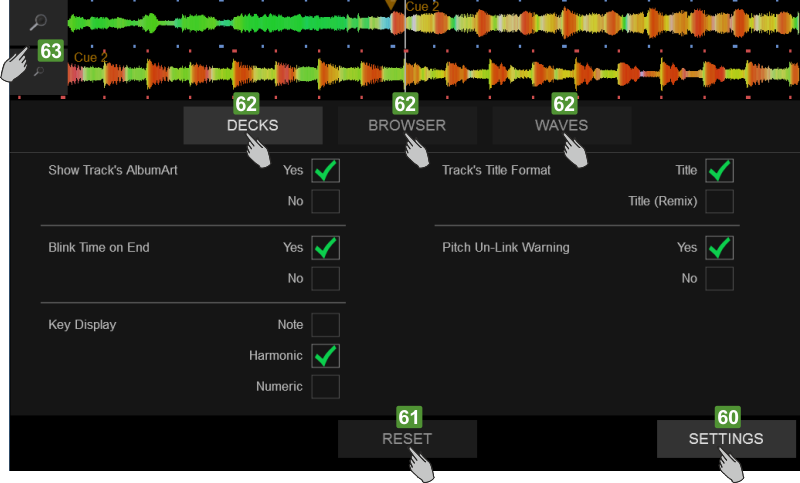
60Tap the [SETTINGS] button from the bottom NAVIGATION section of the screen, to select the Settings View. Tap again to return to the selected Decks View61Tap this button to reset all settings to their default values62The Settings View offers 3 blocks of settings. Tap one of those buttons to select the Decks, Browser or Waves block of Settings.63Tap these 2 buttons to Zoom In/Out the selected Wave View.DECK SETTINGS
Tap the [DECKS] button in the Settings View to select the Deck Block of Settings
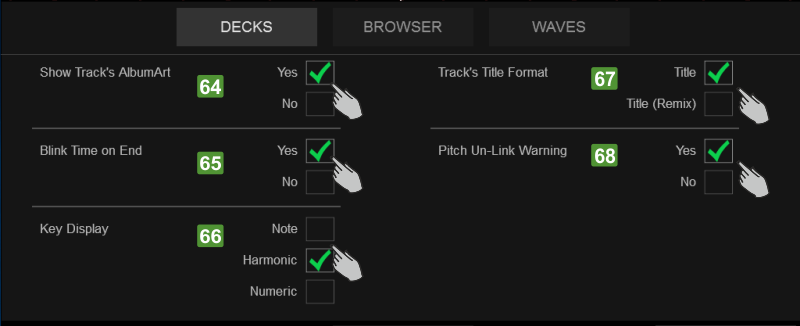 64Show Track’s Album Art. If set to Yes (default value), the Album Art of the Track will be displayed on the Deck INFO section of the Touch Display. When set to No, the Album Art will not be displayed on the Deck INFO section, providing more space for the Artist and Title of the track. Tap the corresponding button to make your selection..65Blink Time on End. If set to Yes (default value), the Elapsed/Remain Time on the Deck INFO section of the Touch Display will start blinking (from white to gray) when the track reaches 30 seconds before its end. If set to No, the Elapsed/Remain Time will not blink. Tap the corresponding button to make your selection.66Key Display. If set to Note, the Key value on the Deck INFO section will be displayed in the musical notes form. (A#, Am, B# etc.). If set to Harmonic (default value), the Key value will be displayed in the Camelot form (8A, 12B etc.). If set to Numeric, the Key value will be displayed as a relative value compared to the original Key of the track (0 if the current Key matches the original, -1 if moved one semitone down, +3 if moved 3 semitones up etc). Tap the corresponding button to make your selection.67Track’s Title Format. If set to Title (default value), only the Title of the track will be displayed in the Deck INFO section. If set to Title (Remix), the Title will be displayed along with the Remix of the track in a form of Title (Remix). Tap the corresponding button to make your selection.68Pitch Un-Link Warning. If set to Yes (default value), Up/Down Arrows will be displayed next to the Pitch value on the Deck INFO section, if the Software and Hardware Pitch values don’t match (e.g. [SYNC] is pressed on the Touch unit, the software Pitch is moved to match the BPM value of the other Deck and the Hardware Pitch fader position is on a different position). If set to No, the Up/Down Arrows will not be displayed. ). Tap the corresponding button to make your selection
BROWSER SETTINGS
Tap the [BROWSER] button in the Settings View to select the Browser Block of Settings
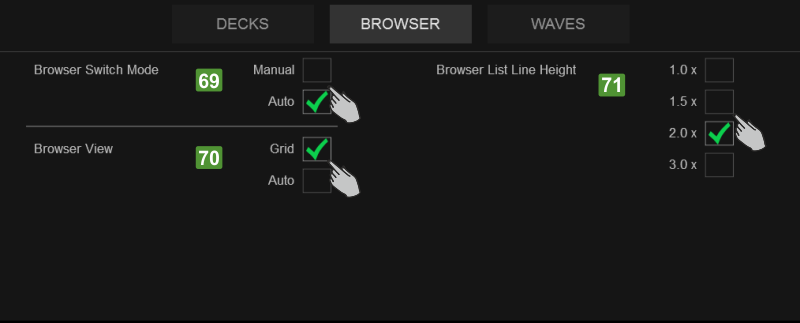 69Browser Switch Mode. If set to Manual, the Browser View will be offered on the Touch Display only via the [BROWSER] button at the bottom Navigation section. If set to Auto (default value), the Browser View will be offered not only via the [BROWSER] button on the Touch Display, but also whenever the [BROWSE] or [BACK] buttons are used from the Touch unit and will automatically return to the Decks view, if a Track is loaded (via the [LOAD] buttons) or no Browsing action is performed from either the Touch Display or the Touch unit. Tap the corresponding button to make your selection.70Browser View. If set to Grid (default value), the Lists of the Browser View (Folders, Songs and Sideview) will be displayed in boxes, offering an easier navigation/selection. If set to Auto, the Lists of the Browser View will be displayed in Lines or Boxes following the Main Browser View (List or Grid) on the VirtualDJ main GUI. Tap the corresponding button to make your selection.71Browser List Line Height. Select the height that the Lines will have when the Auto Browser View is selected from the Touch Display Settings and the List view mode is selected from the VirtualDJ main GUI. The value 2.0 x (default) means double the height of the original. The setting has no effect on the Grid Display Browser View.
WAVE SETTINGS
Tap the [WAVES] button in the Settings View to select the Waves Block of Settings
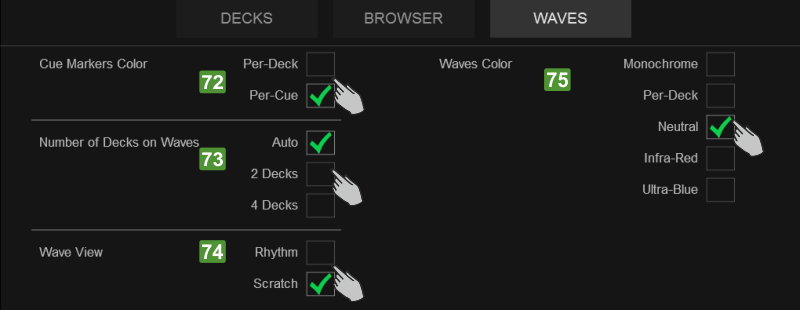 72Cue Markers Color. If set to Per Deck (default value), the Markers for the HotCues on the Waves and Progress Bars will get the color of the corresponding deck (blue for Deck 1, red for Deck 2 etc.) If set to Per Cue, the Markers for the HotCues will get a pre-defined color (depending on their number) or the one assigned from the POI Editor. Tap the corresponding button to make your selection.73Number of Decks on Waves. If set to Auto (default value), the top Wave section of the Touch Display will automatically show 2 or 4 decks, depending on the Decks view. Will show 2 Decks (Left and Right) if the 2 Decks or the 2 Deck Video views are selected and all 4 decks if the 4 Decks view is selected. If set to 2 Decks, the Waves of the Left and Right selected Decks will be displayed regardless the selected Decks view. If set to 4 Decks, the waves of all 4 Decks will be displayed, regardless the selected Decks view or the loaded tracks. Tap the corresponding button to make your selection.74Wave View. If set to Rhythm (default value), the Wave of the Decks at the top section of the Touch Display will be displayed in the Rhythm view. If set to Scratch, the Wave of the Decks will be displayed in the Scratch View. Tap the corresponding button to make your selection.75Waves Color. Select one of the 5 coloring types for the Waves. The selection affects both the Scratch Wave views and the Track’s Progress bar at the Deck INFO section. Monochrome is the default value. Tap the corresponding button to make your selection Advanced Settings


