


Quattro
Top Panel
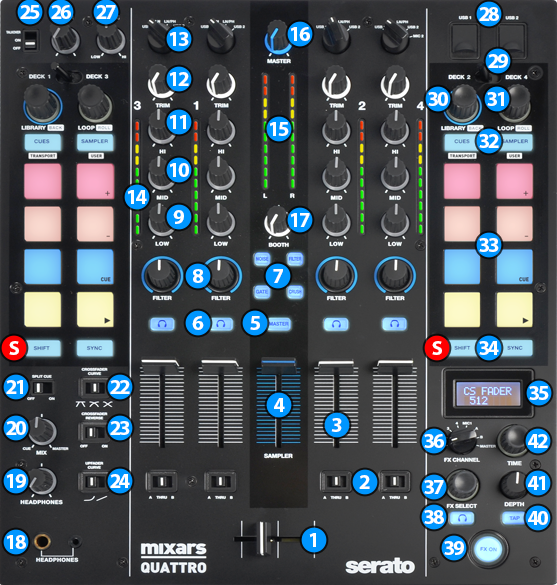
S SHIFT: Hold these buttons down to access secondary functions of Mixars Quattro (mainly in black lettering inside a white box)
MIXER CONTROLS
- CROSSFADER. Blends audio between the channels assigned to the left and right side of the crossfader.
- CROSSFADER CH ASSIGN. Define if a mixer channel will be output regardless of the position of the crossfader (THRU position) or Left/Right positions.
- VOLUME. Adjust the Volume of each channel.
- SAMPLER VOLUME. Adjust the Master Output Volume of the VirtualDJ Sampler
- MASTER CUE (PFL). Send the Master Output of the unit to the Headphones Output channel. Please note that in order to hear the Master Output on your headphones you must also turn the HEADPHONES MIXING (20) knob to the desired position.
- CUE (PFL). Press these buttons to send each channel to the Headphones Output channel.
- SOUND COLOR FX. Select one of the predefined Color Effects (Noise, Filter, Gate and Crush).
Please note that the available Color Effects are offered by Mixars Quattro Firmware and you cannot change/alter them through VirtualDJ (Hardware Effects) - COLOR FX PARAMETER. Adjust the parameter of the selected COLOR FX for each channel. When in middle position, the COLOR FX has no effect on the sound.
- LOW EQ. Adjust the Low frequencies for each mixer channel.
- MID EQ. Adjust the Mid frequencies for each mixer channel.
- HI EQ. Adjust the High frequencies for each mixer channel.
- GAIN. Adjust the Gain of each mixer channel. Note that the "zero gain / park" position is 12 o clock.
- INPUT SELECTORS. Define the source of each Channel. Put the switchers to USB A or USB B position for software mixing.
- CH INPUT VUMETER. Shows each channels input (pre fader) volume.
- MASTER OUTPUT VUMETER. Shows the master output volume of the unit.
- MASTER VOLUME. Adjust the level of the Master Output. Hardware operation but movement visible on the VirtualDJ GUI
- BOOTH VOLUME. Adjust the level of the Booth Output. Hardware operation, not visible on the VirtualDJ GUI.
- HEADPHONES CONNECTOR. Connect your headphones. Both sizes (3.5mm and 6.35mm ( 1⁄4 in)) are offered.
- HEADPHONES VOLUME. Adjust the volume of the Headphones Channel. Hardware operation, but movement visible on the VirtualDJ GUI.
- HEADPHONES MIXING. Adjust how the Channels and the Master Output blend at the Headphones Channel. Hardware operation, but movement visible on the VirtualDJ GUI.
- SPLIT CUE. If enabled, the headphones signal gets split: Master signal on one channel, and the enabled Cue signals selected via the CUE/PFL buttons (6) on the other channel.
- CROSSFADER CURVE. Set the desired crossfader curve to one of the three available options (Scratch, Smooth, Full)
- CROSSFADER REVERSE. Reverses the Left with the Right Channel control on the Crossfader (1)
- CHANNEL FADER CURVE. Set the desired channel fader curve to one of the two available options (logarithmic, linear)
- MIC CONTROL. Turn ON and OFF the MIC Input or enable the auto Talk Over function. (Hardware operation)
- MIC VOLUME. Adjust the level of MIC Input. Hardware operation, not visible on the VirtualDJ GUI.
- MIC TONE. Adjust a single parameter EQ for MIC Input. Hardware operation, not visible on the VirtualDJ GUI.
- USB CONNECTORS. Use a standard USB cable to connect Mixars Quattro with your computer.
DECK CONTROLS
- DECK. Use this switch to toggle whether the controls of this side will control deck 1 or deck 3 (for left side), or deck 2 or deck 4 (for right side).
- LOOP. Turn this knob to adjust the size used by automatic loops, or to change the length of the current loop. Press the knob down to activate/deactivate an automatic loop. Hold down SHIFT and press the knob down to activate a momentary Loop Roll effect (for as long as the knob is held down)
- SYNC: Press this button to automatically match the corresponding Deck's tempo with the opposite Deck's. Hold SHIFT and press this button to reset the track's pitch back to it's original value.
BROWSER CONTROLS
- BROWSE.
Turn: Scrolls through files or folders.
Push: If focus is on the Songs list press the knob to load the selected track. If focus is on the Folders list, press the knob to set focus on the Songs list.
Hold down SHIFT and press this knob while focus is on Folders list to open/close it's subfolders.
PAD CONTROLS
The 8 Pads offer various functions, depending on the selected Pad mode. Each of the 2 Pad mode buttons offers 2 individual modes. One with the press of the mode button, and an additional mode with press of the mode button while SHIFT is held down. The 4 modes represent a page of the PADS section on the default VirtualDJ GUI.
- PAD MODE. Press any of the 2 available Pad mode buttons to set the Pads to Hotcues, and Sampler mode.
Hold down SHIFT and then press any of the 2 available Pad mode buttons to set the Pads to Transport, and User mode. - PADS: These PADS offer 4 modes depending on the selected mode.
HOTCUES:
Each one of the 8 pads assigns a Hot Cue Point, or jumps the track to that Hot Cue Point (if assigned).
When a Hot Cue Button is unlit, you can assign a Hot Cue Point by pressing it at the desired point in your track. Once it is assigned, the Hot Cue Button will light on.
Hold SHIFT and then press a pad to delete its assigned Hot Cue Point.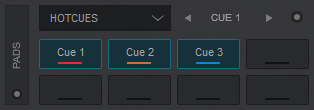
Hotcues Pads Page – VirtualDJ GUI, PRO Layout 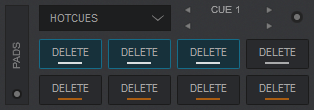
Hotcues Pads Page while SHIFT is held down – VirtualDJ GUI, PRO Layout
SAMPLER:Each one of the 8 pads triggers a sample from the selected Sampler Bank of VirtualDJ. If a bank has less than 9 samples, both sides of Mixars Quattro will control the same samples. If a bank has more than 8 samples, the left side of Mixars Quattro will control samples 1 to 8 and the right side samples 9 to 16.
Press the pads to trigger a sample. Depending on the selected trigger Pad mode, use SHIFT and the same pads to stop the sample.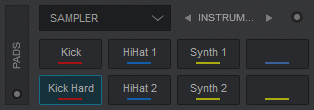
Sampler Pads Page – VirtualDJ GUI, PRO Layout
TRANSPORT:
Each one of the first 4 pads assigns a Hot Cue Point, or jumps the track to that Hot Cue Point (if assigned).
When a Hot Cue Button is unlit, you can assign a Hot Cue Point by pressing it at the desired point in your track. Once it is assigned, the Hot Cue Button will light on.
Hold SHIFT and then press a pad to delete its assigned Hot Cue Point.
The rest 4 pads control the deck playback:
Use Pads 5 and 6 to bend (alter the pitch momentarily) the track down or up.
Hold SHIFT and use Pads 5 and 6 to decrease or increase the speed of the track (by altering it's pitch)
Use Pad 7 to cue the track.
Hold SHIFT and use Pad 7 to stop the track (and jump between the start of the track and the stored cue points)
Use Pad 8 to play or pause the track.
Hold SHIFT and use Pad 8 to restart playback from the last playback point (stutter)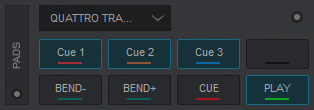
Transport Pads Page – VirtualDJ GUI, PRO Layout 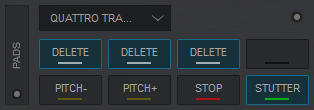
Transport Pads Page while SHIFT is held down – VirtualDJ GUI, PRO Layout
USER:In this mode the 8 pads are blank by default. You can customize these pads by using VirtualDJ Pads Editor to add functions that suit your own needs.
For more information please read the Manual of VirtualDJ 2020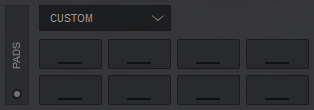
Custom Pads Page – VirtualDJ GUI, PRO Layout
EFFECT CONTROLS
Mixars Quattro offers a variety of effects that you can apply to your mix. These effects are offered by Quattro firmware and you cannot control/alter them through VirtualDJ (hardware effects). However VirtualDJ will pass the BPM of each track on the effect engine of Mixars Quatrro.
For more information about the build in effects, please refer to Mixars Quatrro User Manual.
- LCD DISPLAY. Shows various information regarding the selected effect and it's parameters.
- FX ASSIGN. Use this selector knob to select to which source the effects will apply to.
- FX SELECT. Use this knob to scroll the list of the available effects. Press the knob down to select the displayed effect. The name of the selected effect is displayed on the LCD screen.
- FX PFL. Press this button to send the sound of effect engine on your headphones.
- FX ON. Use this button to enable/disable the selected effect.
- FX TAP. Tap this button a few times to set a new BPM for the effect engine to use.
- FX DEPTH. Use this knob to adjust the strength of the applied effect.
- FX TIME. Use this knob to adjust the timing of beat-aware effects. Press this knob to toggle between time (in ms) and beats. The selected value is displayed on LCD screen.