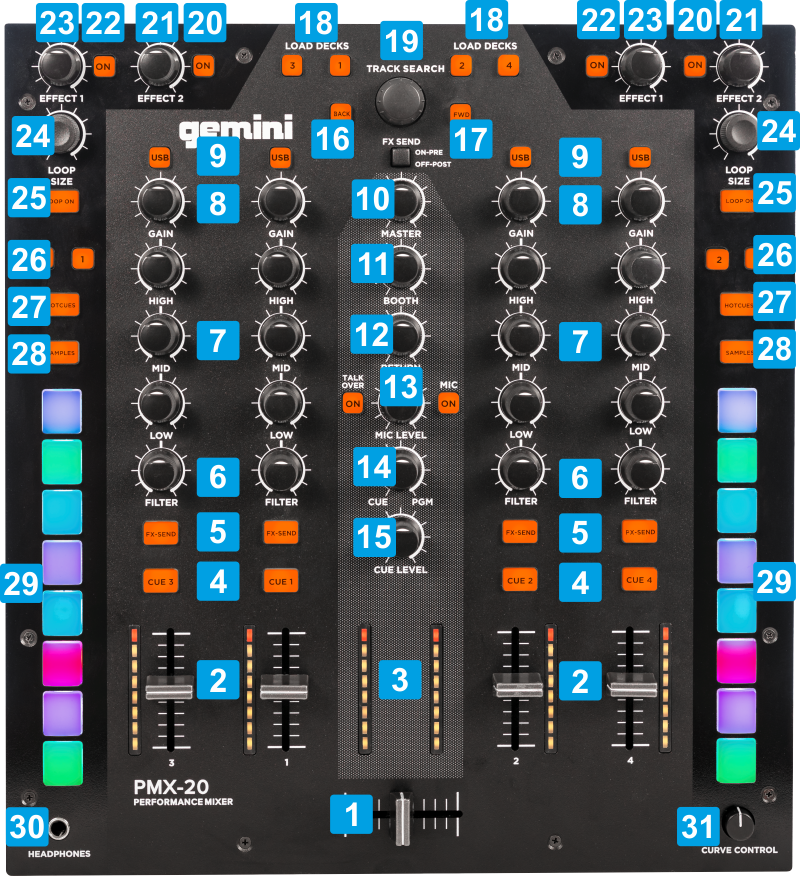
1 CROSSFADERBlends Audio signal from left/right assigned channels2 VOLUMEAdjust the Output Volume of each Channel. The series of leds next to each Volume fader indicate the pre-fader output level of each channel3 MASTER VU METERThis series of leds indicate the output level of Left/Right stereo channels of the Master Output4 CUEUse these buttons to send the pre-fader audio signal of each channel to the Headphones channel for pre-listening5 FX SENDIf an external Effect generator device is connected at the reap panel to SEND/RETURN sockets, use these buttons to send (and receive) the processed audio signal of each channel from that device6 FILTERApply a High/Low Pass Filter to each channel. When in middle position, no Filter is applied.7 EQUALIZERAdjust the 3 Equalizer bands (High/Mid and Low) for each channel.8 GAINAdjust the pre-fader output level of each channel.9 USBUse these buttons to select the source of each mixer channel. When disabled/off, the audio signal from the source connected to the respective Input CH (rear panel) wil lbe routed to the mixer channel and the respective VirtualDJ deck will be muted. Enable (led ON), to allow control and audio signal from a VirtualDJ deck.10 MASTER VOLUMEAdjust the output volume of the Master Output (connection at the rear panel)9 BOOTH VOLUMEAdjust the output volume of the Booth Output (connection at the rear panel)12 RETURNAdjust strength of the signal coming from the Return Input (rear panel)13 MIC CONTROLSAdjust the output volume of the Microphone Input (connection at the rear panel), turn on/off the Microphone or enable the TALK OVER to automatically reduce output level when signal is detected from the Microphone Input.14 CUE/PGMBlends audio signal from Master Output (when in PGM) and channels that have the CUE enabled (when in CUE) and sends to the Headphones Output (connection at the front panel)15 CUE LEVELAdjust the volume of the Headphones Output (connection at the front panel)16 BACKUse this button to set focus to the Folders list of Browser. If focus is on the Folders List, use this button to open/close sub-folders. When the SAMPLES buttons is pressed, use this button to select the next available Sampler Trigger mode (on/off, hold, stutter and unmute)17 FWDUse this button to set focus to the next Browser window/list (Folders, Files, Sideview). While the SAMPLER button is pressed, use this button to load and select the next available Sampler Bank18 LOADPress to load the selected track from Browser to deck 3,2,1 or 4.19 TRACK SEARCHScrolls though files or folders depending on the selected Browser window. When focus is on Folders list, push to set focus to the Files/Tracks List.
While the SAMPLER button is pressed, use this encoder to adjust the Sampler Master Volume20 EFFECT 2 - ONUse this button to toggle between FX Select and FX Param modes.21 EFFECT 2 - KNOBWhen the FX Select mode is enabled (default mode - EFFECT 1 - ON is off) use this knob to adjust the 2nd Parameter of the selected Effect on Left/Right assigned Deck. When the FX Param mode is enabled (EFFECT 1 - ON is on) use this knob to select the Effect for the Left/Right assigned Deck22 EFFECT 1 - ONUse this button to enable/disable the selected Effect on Left/Right assigned Deck23 EFFECT 1 - KNOBAdjust the 1st Parameter of the selected Effect on Left/Right assigned Deck24 LOOP SIZEHalve (anti-clockwise) /Double (clockwise) the size of the Loop25 LOOP ONEnable/disable an auto-loop of the selected size in beats for the Left/Right assigned deck26 DECK ASSIGNUse these buttons to assign a deck as Left/Right. The Effect, Loop and Pads section of the PMX20 will apply their assigned functions to the selected Left/Right deck. Use the left-side button 1 to assign Deck 1 as Left deck Use the left-side button 3 to assign Deck 3 as Left deck. Use the right-side button 2 to assign Deck 2 as Right deck Use the right-side button 4 to assign Deck 4 as Right deck.27 CUESSets the 8 colored Pads to Hotcues mode.28 SAMPLESSets the 8 colored Pads to Sampler mode.29 PADSIn Hotcues mode : Use the pads to assign Hotcues 1 to 8 or jump to their stored positions if not assigned. Hold CUES button down and then press a Pad to delete its stored Hotcue. In Sampler mode : Use the pads to trigger samples 1 to 8 from the selected Sampler Bank. Depending on the selected Trigger mode, you may find useful to stop a playing sample, by holding down the SAMPLES button and pressing the related pad. 30 EFFECT 1 - KNOBConnect a pair of Headphones to this socket (for pre-listening) using a 1/4" cable/plug31 CURVE CONTROLUse this knob to adjust the curve/slop for the Crossfader (smooth when at minimum position, cut/scratch when at maximum) Rear panel