


MC-6000
MIXER
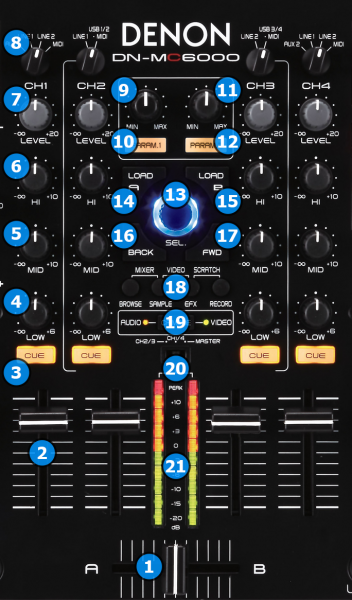
- CROSSFADER: Blends audio (or video, or both) between the channels assigned to the left and right side of the crossfader.
- VOLUME: Volume Faders (mixer channel order is 3-1-2-4 decks). Note that the faders will not alter the sound of the corresponding software deck, if the INPUTS switchers are on LINE/AUX positions, but the sound of the software decks will still go through the Master Output.
- PFL: Press these buttons to send this channel's pre-fader signal to the Cue Channel for monitoring. When engaged, the button will be lit.
- EQ LOW: Adjusts low (bass) frequencies of the corresponding channel in the software or hardware Input.
- EQ MID: Adjusts the middle (mid) frequencies of the corresponding channel in the software or hardware Input.
- EQ HI: Adjusts the high (treble) frequencies of the corresponding channel in the software or hardware Input.
- GAIN: Adjusts the audio level (gain) of the corresponding channel in the software or hardware Input. For software, the 0db gain position is the 12 o' clock position.
- INPUT SELECTOR: Set this switch to the desired audio source for this channel: MIDI (a track playing on that layer in the software), LN1/2/AUX1/2 (a device connected to the Line / Aux Inputs on MC6000 rear panel).
Note: The software deck will still be outputted on Master Output if the switcher is on LINE / AUX positions. - PARAM 1: Use this knob to select the desired Video Transition. Hold down SHIFT and turn this knob to adjust the first parameter of the selected video transition (if offered)
- PARAM 1 BUTTON: Push this button to activate a Video Transition between left and right decks. Hold down SHIFT and push this button activate a momentary video transition (the transition will take place for as long as you hold the button pushed)
- PARAM 2: Use this knob to select the desired Master Video Effect. Hold down SHIFT and turn this knob to adjust the first parameter of the selected master video effect (if offered)
- PARAM 2 BUTTON: Push this button to activate the Master Video Effect. Hold down SHIFT and push this button to momentary activate the master video effect (effect will be active for as long as you hold the button pushed)
- BROWSE:
Turn: Scrolls through Folders or Files. Hold SHIFT down and turn this encoder to scroll through the library in larger steps.
Push: If focus is on the Folders List, push the encoder to enter to the Songs List or hold SHIFT down and then push the encoder to expand/collapse Subfolders.
If focus is on the Songs List, push the encoder to load the selected track from the Songs List to the Automix List or hold SHIFT down and then push the encoder to load the selected track from the Songs List to the Sidelist. - LOAD A: Press this button to load the selected track from the Browser to the left deck. Hold this button for more than 1 second to unload the left deck.
Hold SHIFT down and press this button, to load the other deck of the same side (if deck 1 is the left deck then load deck 3). Hold this button for more than 1 second (while still holding SHIFT button) to unload the other deck of the same side (if deck 3 is the left deck, then unload deck 1) - LOAD B: Press this button to load the selected track from the Browser to the right deck. Hold this button for more than 1 second to unload the right deck.
Hold SHIFT down and press this button, to load the other deck of the same side (if deck 4 is the right deck then load deck 2). Hold this button for more than 1 second (while still holding SHIFT button) to unload the other deck of the same side (if deck 2 is the right deck, then unload deck 4) - BACK: Sets focus to the previous Browser Window. Hold SHIFT down and press this button to select the previous Sideview List.
- FWD: Sets focus to the next Browser Window. Hold SHIFT down and press this button to select the next Sideview List.
- BROWSER/SKIN VIEW:
- [list]
- BROWSE: Press this button to set focus to the next Browser Window. Hold this button down and press the SAMPLE button to activate the "MIXER" central panel of the Default skins.
- SAMPLE: Press this button to show Sampler window of the VirtualDJ Browser. Hold this button down and press the EFX button to activate the "VIDEO" central panel of the Default skins.
- EFX: Hold this button down and press the RECORD button to activate the "SCRATCH" central panel of the Default skins.
- RECORD: Press this button to start/stop recording of your mix.
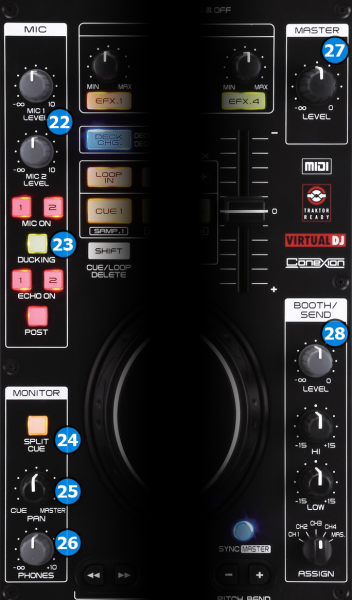
- CF-LINK: Each time this button is pressed, the CROSSFADER (1) will control the Audio, the Video or both crossfaders of VirtualDJ. The leds on the sides of the button indicate the selected mode.
Note: If the LINK (Video Crossfader Link action) from the VIDEO center panel of the default skin of VirtualDJ is enabled, the crossfader of the MC6000 will still control both audio and video crossfaders even if the CF-LINK button is on the AUDIO position. - VU-METER CH SELECT: Use this switch to select which channels are visible on the VU-METERS (21).
- VU-METERS: When the VU-METER CH SELECT switcher (20) is on the MASTER position, the VU meters will show the Output Volume of the Master Output, and they will show the Output Level of the corresponding deck if the switcher is on the CH positions.
HARDWARE MIXER ELEMENTS
All the elements on the above picture operate in hardware level. This means that the MC6000 firmware is responsible for operating these elements. Some of these elements offer MIDI notes and they can be used for your own mapping needs. These elements are not used in default mapper of VirtualDJ.
- MIC LEVEL 1/2: Adjust the volume of the two MIC inputs of Denon MC6000
- MIC CONTROL:
- [list]
- MIC ON 1/2: Turn ON/OFF the corresponding MIC input.
- DUCKING: Turn ON/OFF ducking for the MIC inputs (lower other channels volume when you talk on the MIC, also known as talk-over).
- ECHO ON 1/2: Turn ON/OFF an echo effect on the corresponding MIC input.
- POST: Use the echo effect of the MIC's as a post fader effect (echo trailing may keep heard even if you switch MIC's off until the effect fades out completely)
- SPLIT CUE: Split headphones mix so that channel mix is on the right side and master mix is on the left side of your headphones.
- HEADPHONES MIX: Mixes the headphones audio between channel mix (all the way to the left) and master mix (all the way to the right).
- HEADPHONES VOLUME: Adjusts the volume of your headphones.
- MASTER VOLUME: Adjust the master volume output of the unit.
- BOOTH/SEND CONTROLS:
- [list]
- BOOTH LEVEL: Adjust the booth output volume.
- BOOTH EQ HI: Adjust the high frequencies of the booth output.
- BOOTH EQ LOW: Adjust the low frequencies of the booth output.
- BOOTH ASSIGN: Adjust which channel will be send on the booth output.