


Hello Skin Experts,
About a week ago I posted this in a German forum, but unfortunately I haven't received a reply yet.
So, I wanted to write here using Google Translate, hoping to get some advice or recommendations.
Now, a question/request for you:
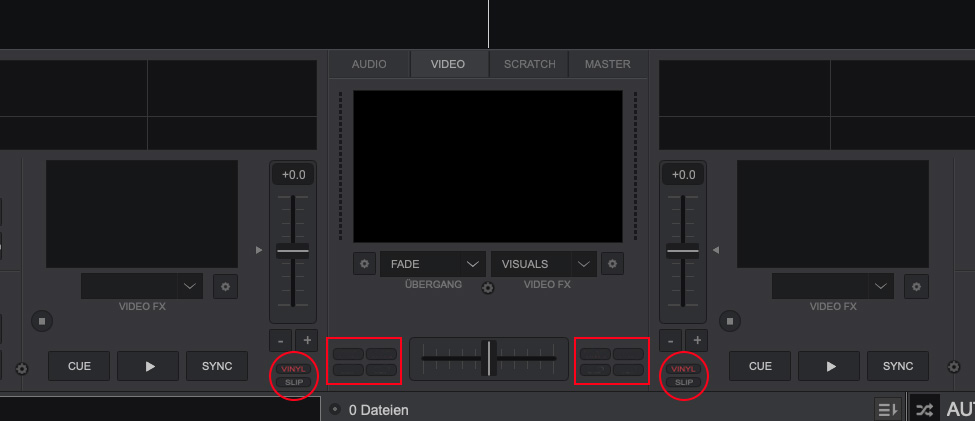
How can I move the "Vinyl and Slip" buttons from the top to the bottom of the VDJ original "Pro" video skin (as shown in the picture)? Just like the original, with the left and right sides symmetrical.
And, again as shown in the picture, how can I create four additional buttons on each side, but separately? So, four on the left and four on the right, independent of each other.
Is this difficult to do for someone who doesn't have much experience?
Or what would I need to do to achieve this?
Thanks in advance.
Regards, esgoez
About a week ago I posted this in a German forum, but unfortunately I haven't received a reply yet.
So, I wanted to write here using Google Translate, hoping to get some advice or recommendations.
Now, a question/request for you:
How can I move the "Vinyl and Slip" buttons from the top to the bottom of the VDJ original "Pro" video skin (as shown in the picture)? Just like the original, with the left and right sides symmetrical.
And, again as shown in the picture, how can I create four additional buttons on each side, but separately? So, four on the left and four on the right, independent of each other.
Is this difficult to do for someone who doesn't have much experience?
Or what would I need to do to achieve this?
Thanks in advance.
Regards, esgoez
Posted 2 days ago @ 10:04 am
 locoDog
Somewhat difficult and a lot to explain for a complete beginner
in the skin you'll find the buttons twice in the skin, this is the right deck.
<pos x & y /> are what you want to change
To get it to show in both deck views [platter and video mode] you'll want to take it [the whole code block] out of
<group name="area_jogwheel_buttons"
and place it in
<group name="area_transport"
Adding buttons, is a bit more intermediate, making a copy of an existing button and moving it would be how to start learning.
But you'll have to get your head round skin conditions and offsets to get it right, not impossible but,
Like starting anything new, it can take time to first get the basics before you can even get close to making your idea.
I could knock it out pretty quickly, even comment the changes made so you can understand easier for future tweaks, if you think that's worth a beer or two for the favour saving you the time, you can send me a pm.
<button action="vinyl_mode">
	<pos x="+180+12" y="+0"/>
	<size width="38" height="13"/>
	<off shape="square" color="buttonoff" border="bordercolor" border_size="1" radius="5" />
	<over shape="square" color="buttonoff" border="bordercolor" border_size="1" radius="5"/>
	<down shape="square" color="buttonon_invert" border="bordercolor" border_size="1" radius="5"/>
	<text fontsize="9" color="textdark" colorover="textover" colordown="deckcolor_invert" weight="" align="center" text="VINYL" localize="true" important="true"/>
</button>
<button action="slip_mode">
	<pos x="+180+12" y="+13+4"/>
	<size width="38" height="13"/>
	<off shape="square" color="buttonoff" border="bordercolor" border_size="1" radius="5" />
	<over shape="square" color="buttonoff" border="bordercolor" border_size="1" radius="5"/>
	<down shape="square" color="buttonon_invert" border="bordercolor" border_size="1" radius="5"/>
	<text fontsize="9" color="textdark" colorover="textover" colordown="deckcolor_invert" weight="" align="center" text="SLIP" localize="true" important="true"/>
</button>
in the skin you'll find the buttons twice in the skin, this is the right deck.
<pos x & y /> are what you want to change
To get it to show in both deck views [platter and video mode] you'll want to take it [the whole code block] out of
<group name="area_jogwheel_buttons"
and place it in
<group name="area_transport"
Adding buttons, is a bit more intermediate, making a copy of an existing button and moving it would be how to start learning.
But you'll have to get your head round skin conditions and offsets to get it right, not impossible but,
Like starting anything new, it can take time to first get the basics before you can even get close to making your idea.
I could knock it out pretty quickly, even comment the changes made so you can understand easier for future tweaks, if you think that's worth a beer or two for the favour saving you the time, you can send me a pm.
Posted 2 days ago @ 10:42 am
locoDog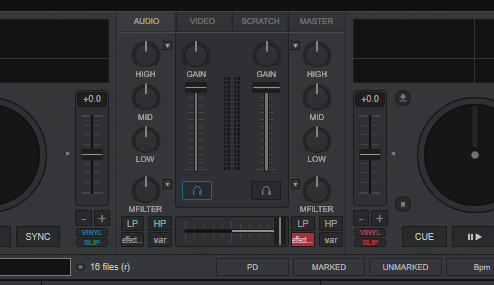
Something like that, but needs a touch of tidying up, Not hard for a skinner but still a fiddly job.
Posted 2 days ago @ 1:05 pm
locoDog wrote :
Something like that, but needs a touch of tidying up, Not hard for a skinner but still a fiddly job.
Something like that, but needs a touch of tidying up, Not hard for a skinner but still a fiddly job.
Hello LocoDog..
Thank you for your offer, that is really very kind of you.
But it’s not about having someone else do it for me — I want to do it myself. I want to learn how to do this. I just need the path or a guideline on what I need to pay attention to.
If I can’t manage it on my own, I will come back to your offer.
greeting,
esgoez
Posted yesterday @ 12:03 pm
 groovindj
In simple language I'd put it like this:
Imagine the skin on your screen is a blueprint (top down view) of a House.
Within that house are rooms. The code gives X/Y co-ordinates and sizes for each room within the house, and then X/Y co-ordinates and sizes for all the items in the room (which are the knobs, buttons etc).
The X/Y of the room's contents are given from with the boundaries of the room rather than the house.
So you may have a room for the left deck, another for the right deck, a third for the mixer etc.
Start here -> https://www.virtualdj.com/wiki/Skin%20SDK
Posted yesterday @ 12:25 pm
groovindj wrote :
In simple laguage I'd put it like this:
Imagine the skin on your screen is a blueprint (top down view) of a House.
Within that house are rooms. The code gives X/Y co-ordinates and sizes for each room within the house, and then X/Y co-ordinates and sizes for all the items in the room (which are the knobs, buttons etc).
The X/Y of the room's contents are given from with the boundaries of the room rather than the house.
So you may have a room for the left deck, another for the right deck, a third for the mixer etc.
Start here -> https://www.virtualdj.com/wiki/Skin%20SDK
Thank you very much groovindj,
I will take a look at it at my leisure.
Posted yesterday @ 12:33 pm