


RMX90
REAR PANEL
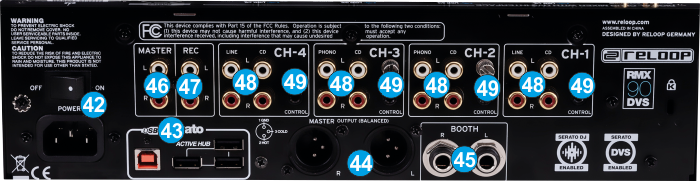
- POWER.ON/OFF. Connect a universal AC cord to the AC socket and power on the unit after all the necessary connections are done.
- USB Use a USB cable to connect the RMX90 with a USB port of your computer and allow the unit to send and receive audio and Midi signals
The RMX90 is also offering a USB hub to connect other USB devices, instead of using USB ports of your computer. - MASTER OUT (BALANCED) Connect your amplifier using a pair of balanced XLR jacks. The level of this output is controlled by the MASTER VOL knob at the top panel
- BOOTH OUT Use a pair of balanced ¼“ TRS jacks to connect the unit with your secondary output (e.g. for monitor). The level of this output is controlled by the BOOTH knob at the top panel. The RMX90 provides the ability to send a separate channel input to this Output. Selection is done via the UTILITY menu. See Utilities .
- MASTER OUT (UNBALANCED). Connect your amplifier using a pair of RCA cables. The level of this output is controlled by the MASTER LEVEL knob at the top panel
- REC OUT. Additional unbalanced Output. Use standard RCA cables and send the Master Output to an external recording device.
- CH INPUTS. 2 x Phono/CD and 2 x LINE/CD inputs are provided by RCA jacks (one for each Deck/mixer channel). PHONO Inputs on CH2 and CH3 can be used to connect turntables. CD Inputs (in all 4 mixer channels) can be used to connect CD Players. LINE Inputs in CH1 and CH4 can be used to connect other analogue Auxiliary Sources.
- CONTROL. 3.5mm mini phone jack type connections. If you connect a supported Player with the supplied Control cables, you will be able to start/stop playback with the Volume faders of the RMX90. Please consult the manual of the RMX90 for supported Players..
Inputs & Recording