


Kontrol X1 MK3
KONTROL X1 MK3
BASIC CONTROLS
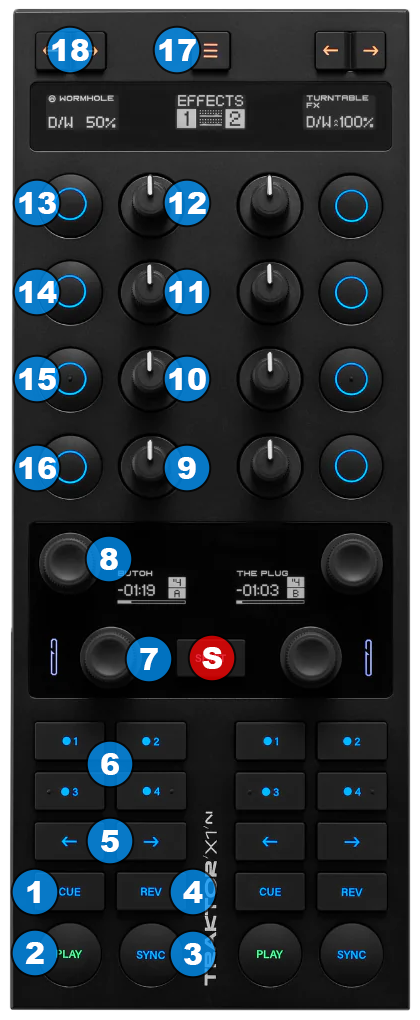
- S SHIFT : Hold this button down to access secondary functions of Kontrol X1 MK3
- CUE: When the Deck is paused, you can set a temporary Cue Point by using the BEND/SEEK buttons (5) to place the Audio Pointer at the desired location and then pressing the Cue Button.
During playback, you can press the Cue Button to return the track to this Cue Point. (If you did not set a Cue Point, then it will return to the beginning of the track.).
If the Deck is paused, you can press and hold the Cue Button to play the track from the Temporary Cue Point. Releasing the Cue Button will return the track to the temporary Cue Point and pause it. To continue playback without returning to the Temporary Cue Point, press and hold the Cue Button, then press and hold the Play Button, and then release both buttons.
Hold down SHIFT and press this button to return to the start of the track. Playback status of the track will not be changed. - PLAY/PAUSE: Plays / Pauses the track.
Hold down SHIFT and press this button to restart playback from the last paused position (play/stutter) - SYNC: Press this button to automatically match the corresponding Deck's tempo with the opposite Deck's (or the Master Deck’s if using a 4 decks Skin) tempo and phase.
Hold down SHIFT and press this button to reset the deck Tempo back to it's original value. - REV: Press and hold this button to play the track in reverse direction while the button is pressed. Release the button to resume normal (forward) playback direction. Upon releasing the button, the track will continue playback from where the track would have been if you had not enabled reverse playback.
Hold down SHIFT and press this button to toggle between forward and reverse playback directions. When you toggle playback direction, the track keeps playing from it's current playback position. - BEND/SEEK: While the track is playing, press and hold these buttons to pitch bend the track in order to match the track's phase with that of the other deck.
When the track is paused, press and hold these buttons to fine tune your position inside the track.
Hold down SHIFT and press these buttons to continuously seek inside the track. - PADS: These four buttons can offer different functionality depending on the currently selected PAD MODE on VirtualDJ GUI. Kontrol X1 MK3 does not offer a way to select a pad mode for it's pads via the controller. However, you can use VirtualDJ GUI to select the desired mode instead.
- LOOP ENCODER: Turn this encoder to select/alter the length of the current loop (if a loop is active), or the predefined loop length for automatic loops (if a loop is not active).
Push this encoder to enter an automatic loop (if a loop is not active) or exit the loop (if a loop is active)
Hold down SHIFT and turn this encoder to either beat jump inside the track (when a loop is not active) or to move the loop (while a loop is active).
The size of beat jumps or loop movement, in beats, is equal to the currently selected loop size. - BROWSE ENCODER: Turn this encoder to scroll through files or folders.
Hold down SHIFT and turn this encoder to switch focus between folders, songs and sideview.
If focus is on folders, push the encoder to switch focus on songs.
If focus is on folders, hold down SHIFT and push the encoder to open/close subfolders.
If focus is not on folders, push the encoder to load the selected track on a deck or double click the encoder to clone the track of the other deck in the current deck.
The remaining controls of Kontrol X1 MK3 can operate in two different modes:
MIXER mode, and EFFECTS mode.
You can switch between those two modes on the fly by pressing the MODE SELECT button (17)
When Mixer mode is active, the main color the EQ/EFFECT buttons switches to blue, while when the Effects mode is active, switches to orange. Finally the central upper screen of the Kontrol X1 MK3 will always display the current mode the unit is running.
MIXER MODE
- VOLUME: Use this knob to adjust the volume of the track.
- EQ LOW: Use this knob to adjust the low frequencies of the track.
- EQ MID: Use this knob to adjust the middle frequencies of the track.
- EQ HIGH: Use this knob to adjust the high frequencies of the track.
- KILL HIGH: Press this button to kill the high frequencies of the track. Press again to restore them to their current value.
- KILL MID: Press this button to kill the middle frequencies of the track. Press again to restore them to their current value.
- KILL LOW: Press this button to kill the low frequencies of the track. Press again to restore them to their current value.
- PFL: Press this button to send the audio of the corresponding channel to the headphones output of your audio setup, for monitoring/cueing.
- EQ MODE: Use these buttons to switch the equalizer between Frequency mode and Stems mode.
Hold down SHIFT and press these buttons to switch which deck is controlled by each side of Kontrol X1 MK3.
EFFECTS MODE
Kontrol X1 MK3 can be used in both "Single" and "Multi" effects mode. While it is not possible to change the effects operation mode directly from the unit itself, you can use VirtualDJ GUI to do so.
Kontrol X1 MK3 operates as follows:
SINGLE effects mode:
- COLOR FX: Use this knob to adjust the amount of the select color effect that will be applied on the track.
- FX SLIDER 3: Use this knob to adjust the 3rd parameter of the currently selected effect (if available)
Hold down SHIFT and use this knob to adjust the 6th parameter of the currently selected effect (if available) - FX SLIDER 2: Use this knob to adjust the 2nd parameter of the currently selected effect (if available)
Hold down SHIFT and use this knob to adjust the 5th parameter of the currently selected effect (if available) - FX SLIDER 1: Use this knob to adjust the 1st parameter of the currently selected effect (if available)
Hold down SHIFT and use this knob to adjust the 4th parameter of the currently selected effect (if available) - FX ON/OFF: Use this button to toggle the selected effect on/off
Hold down SHIFT and press this button to select the next available effect. - FX BUTTON 1: Use this button to toggle on/off the 1st parameter of the selected effect (if available)
Hold down SHIFT and press this button to toggle on/off the 3rd parameter of the selected effect (if available) - FX BUTTON 2: Use this button to toggle on/off the 2nd parameter of the selected effect (if available)
Hold down SHIFT and press this button to toggle on/off the 4th parameter of the selected effect (if available) - COLOR FX ON/OFF: Use this button to toggle the selected color effect on/off
Hold down SHIFT and press this button to select the next available color effect.
MULTI effects mode:
- COLOR FX: Use this knob to adjust the amount of the select color effect that will be applied on the track.
- FX 3 SLIDER: Use this knob to adjust the 1st parameter of the effect loaded on the 3rd effect slot (if available)
Hold down SHIFT and use this knob to adjust the 2nd parameter of the effect loaded on the 3rd effect slot (if available) - FX 2 SLIDER: Use this knob to adjust the 1st parameter of the effect loaded on the 2nd effect slot (if available)
Hold down SHIFT and use this knob to adjust the 2nd parameter of the effect loaded on the 2nd effect slot (if available) - FX 1 SLIDER: Use this knob to adjust the 1st parameter of the effect loaded on the 1st effect slot (if available)
Hold down SHIFT and use this knob to adjust the 2nd parameter of the effect loaded on the 3rd effect slot (if available) - FX 1 ON/OFF: Use this button to toggle the effect loaded on the 1st effect slot on/off
Hold down SHIFT and press this button to select the next available effect for the first effects slot. - FX 2 ON/OFF: Use this button to toggle the effect loaded on the 2nd effect slot on/off
Hold down SHIFT and press this button to select the next available effect for the second effects slot. - FX 3 ON/OFF: Use this button to toggle the effect loaded on the 3rd effect slot on/off
Hold down SHIFT and press this button to select the next available effect for the third effects slot. - COLOR FX ON/OFF: Use this button to toggle the selected color effect on/off
Hold down SHIFT and press this button to select the next available color effect.
- FX BEATS: Use these buttons to adjust the length of the effects in beats (for beat-aware effects)
Hold down SHIFT and hold these buttons to save the effects loaded in the effect slots in a bank (2 banks are provided).
Hold down SHIFT and press these buttons to load the effects saved in the associated bank on the effect slots.
