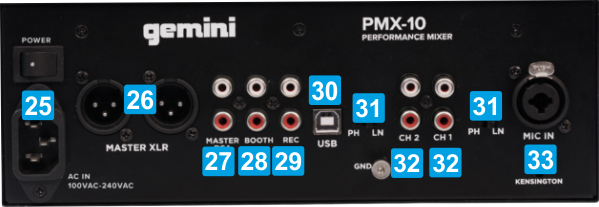
25 POWERConnect PMX10 to an AC socket and power on when all other connections are done 26 MASTER XLRBalanced Master Output. Connect your amplifier (or a pair of amplified speakers) to this output using standard XLR cables. The level of this output is controlled by the MASTER VOL knob at the top panel27 MASTER RCAAlternative unbalanced Master Output. Connect your amplifier (or a pair of amplified speakers) to this output using standard RCA cables. The level of this output is controlled by the MASTER knob at the top panel28 BOOTHSecondary unbalanced Output. Connect your amplifier (or a pair of amplified speakers) to this output using standard RCA cables. The level of this output is controlled by the BOOTH knob at the top panel29 RECRecording unbalanced Output. Connect a Recording device to this output to record your mix30 USBConnect this socket to a USB port of your computer using standard USB cable to allow your computer software to receive and send data to the PMX1031 PH/LNSet these switchers to PH position if you have connected devices to the CH1/CH2 inputs respectively, without pre-amp such as Turntables. Set to LN position in other cases.32 CH1/CH2 InputsConnect your analogue sources/devices to these sockets. The audio signal of these sources will be routed to the Master Output in the following cases. - VirtualDJ (or other supported application) is not running (stand-alone) - VirtualDJ is running, the PMX is set to Hardware (Mixer) mode and the LOAD DECK button is long-pressed (will blink) - VirtualDJ is running with Timecode inputs set in Audio Setup (signal of the Timecode sources) will be muted from output and will be routed to VirtualDJ for DVS control.33 MIC INConnect a Microphone to this input, using XLR or 1/4" cable/adapter. The level of the Microphone audio signal is controlled from the MIC LEVEL knob at the top panel. Note that this input is not part of the USB Audio interface, thus the Microphone of the PMX10 cannot be included in the VirtualDJ Audio setup, nor can be controlled or recorded.
Gemini PMX10 - Front panel
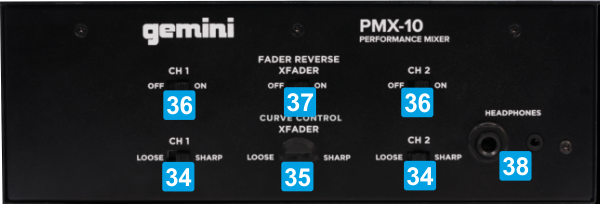
34 CH1/CH2 FADER CURVE CONTROLSelect the curve /slop of Left/Right Channel Volume faders. The LOOSE position offers a linear curve to the Volume faders, while the SHARP position offers a "cut/scratch" curve where audio level is off when fader is completely closed (or very near to the minimum position)35 XFADER CURVE CONTROLUse this knob to select the curve /slop for the Crossfader. The more the knob is set at the left edge, the more smooth (linear) the curve will be and the more the knob is at the right edge , the more "cut" the curve will be (for scratching)36 CH1/CH2 FADER REVERSEWhen set to ON, the volume faders for Left/Right channels, will be reversed, offering zero output when at maximum position and highest output when at minimum.37 XFADER REVERSEWhen set to ON, the crossfader will be reversed, offering output from Left Channel when at maximum/right position and output from Right Channel when at minimum/left position