


Mixon 8 Pro
DECK CONTROLS
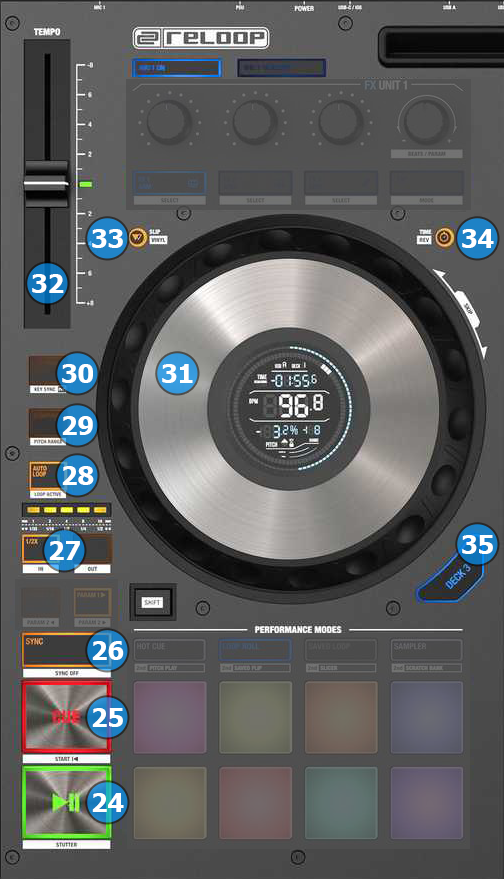
- PLAY/PAUSE. Plays / Pauses the track. Press and hold SHIFT and then press this button to play-sutter the track.
- CUE. When the Deck is paused, you can set a temporary Cue Point by moving the Platter to place the Audio Pointer at the
desired location and then pressing the Cue Button. During playback, you can press the Cue Button to return the track to this Cue Point. (If you did not set a Cue Point, then it will return to the beginning of the track.). If the Deck is paused, you can press and hold the Cue Button to play the track from the Temporary Cue Point. Releasing the Cue Button will return the track to the temporary Cue Point and pause it. To continue playback without returning to the Temporary Cue Point, press and hold the Cue Button, then press and hold the Play Button, and then release both buttons.
Press and hold SHIFT and then press this button to return to the beginning of the track. - SYNC. Press this button to automatically match the corresponding Deck's tempo with the opposite Deck's (or the Master Deck’s if using a 4 decks Skin) tempo and phase.
Hold SHIFT down and then press this button to reset the track's tempo to zero. - LOOP HALF/DOUBLE. Use these buttons to half/double the size of the loop.
If no loop is active, then these buttons adjust the size in beats that's going to be used by automatic loops.
The LEDs above these buttons indicate the selected loop size in beats. When the LED is solid the loop size is designated by the top silkscreen labels. When the LED is flashing, the loop size is designated by the bottom silkscreen labels.
Hold SHIFT down and then use these buttons to set manual loop in and loop out points, for manual looping. - AUTOLOOP. Use this button to enable/disable an auto-loop of the selected size in beats.
Hold SHIFT down and then use this button to enable the last triggered Loop (Re-loop) - SILENT CUE. Press this button to mute the sound of the deck. Press once again or use any of the hotcue pads to restore the sound.
Hold SHIFT down and then use this button to select the next available % range for the Pitch fader. - KEY LOCK. Use this button to lock the key of the track to the current value, and not allow that to change when the Pitch/Tempo is changed (Master Tempo).
Hold SHIFT down and then use this button to match the key of the deck with the one from the opposite deck.
Hold down this key for more than one second to restore the track's key to it's original value. - JOGWHEEL. Touch sensitive platter for scratching (vinyl mode enabled), bending (CD Mode) or Seek mode with built in display. In Vinyl mode, use the jogwheel to scratch and the outer ring to bend.
Hold SHIFT down and then use the jogwheel to navigate through the track (seek mode) - PITCH. Controls the track's playback tempo.
- SLIP. Use this button to enable/disable the Slip mode. When enabled, several functions such as scratching, hotcues and loops will act temporary and when finished, the track will resume playing from the position it would have been if those actions never took place.
Hold SHIFT down and then use this button to enable/disable Vinyl mode. - TIME. Use this button to toggle the display time of the jog display between elapsed and remain modes.
Hold SHIFT down and then use this button to play the track in reverse. - DECK SELECT. Switch Control for the Left decks (1 and 3) and Right Decks (2 and 4).
Effects