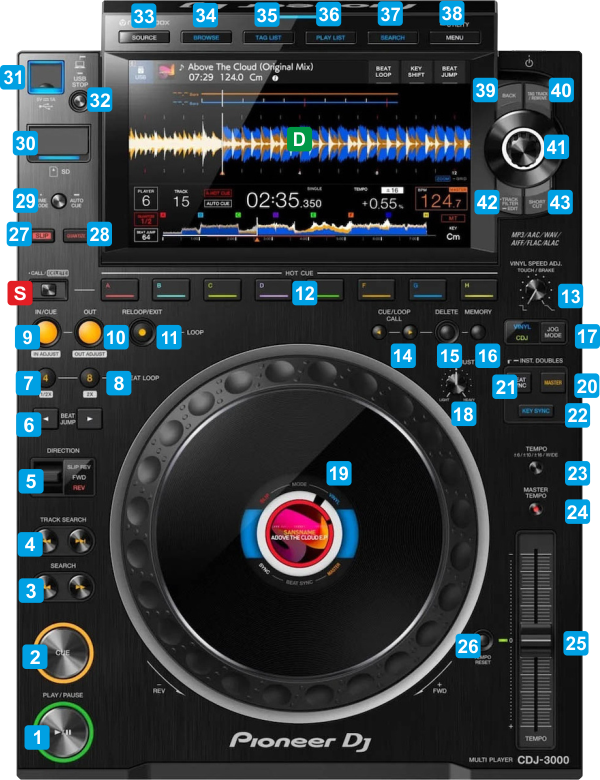
S SHIFTPress and hold this button to access secondary functions as described in this manual D DISPLAYSee functionality in Display Chapter1 PLAYPress to play the loaded track. Press again to pause the track. The LED will blink when track is paused and lit solid when track is playing2 CUEWhen track is paused, press this button to set current track's position as a temporary CUE point. Press and hold this button to preview track while held. While held, press PLAY to continue playing or release to return to the CUE position. When track is playing, press this button to return to the stored CUE position (or the beginning of the track if no CUE is set. The LED of this button will blink if the track is paused but current position is not the stored CUE point and lit solid in all other cases.3 SEARCHPress these buttons to move track backwards/forward by 4 beats (while kept pressed)4 TRACK SEARCHPress the left << button to move track at the beginning. Double-fast press to load the previous track from the focused Browser list. Press the right >> button to load the next track from the focused Browser list. In both cases, the playing status (playing or stopped) will be kept.5 DIRECTIONMove the latch switch down to change the playback direction. When enabled (REV led is lit) the track plays backwards. Move back to the middle position to disable and continue normal playback from the current position. Move and hold the latch to the upper position to play the track in reverse while held. When released, track will resume to the position it would have been if never reversed.6 BEATJUMPUse these buttons to jump the track backwards/forward by the selected amount of beats. Hold SHIFT down and then use these buttons to decrease/increase the amount of the beats for beatjump. The size will be shown on the CDJ-3000 screen7 LOOP 4If track is not in loop, use this button to enable a 4 beats auto-loop. When in loop, use this button to half the size of the loop8 LOOP 8If track is not in loop, use this button to enable a 8 beats auto-loop. When in loop, use this button to double the size of the loop9 LOOP INWhen not in Loop, use this button to set current track's position as the beginning of the loop. When in loop, use this button to enable/disable Loop In Adjust mode (LED will blink fast) and then use the jogwheel to fine-adjust the entry point of the Loop.10 LOOP OUTWhen Loop In is set, use this button to set current track's position as the end point of the loop and enable the loop.. When in loop, use this button to enable/disable Loop Out Adjust mode (LED will blink fast) and then use the jogwheel to fine-adjust the exit point of the Loop.11 RELOOPWhen in loop, use this button to exit the loop. If not in loop, use this button to enable the last triggered loop (reloop) and jump to its position..12 HOT CUE A-HIn Hotcue mode (default) : Use these 8 buttons to assign or trigger Hotcues 1 to 8. When a Hotcue is not assigned, use the button to set a Hotcue at the current track position. When assigned, buttons will jump track to their set position. Hold SHIFT and then use these buttons to delete their assigned Hotcues.
In Stems mode : First 4 buttons control Stems. Buttons 5 to 8 control Stems FX.
In Sampler mode : Trigger Samples 1 to 8.13 SPEED ADJUse this knob to adjust the speed the track will have when paused. If knob is at the minimum position, the track will pause immediately. If in other positions, track will emulate a vinyl brake when paused.14 CUE CALLUse these buttons to jump to the previous/next assigned Hotcue.
Hold SHIFT down and then use these buttons to set the Hotcue buttons to Full (PREVIOUS button) or Split (NEXT button) mode (when in Stems or Sampler mode).15 DELETEDelete the Saved Loop.16 MEMORYSaves a Loop or recall if already saved.
Hold SHIFT down and then use this button to cycle through Hotcues, Stems and Sampler mode for the HOTCUE buttons17 JOG MODESelect the VINYL or CDJ mode for the Jogwheel18 JOG ADJUSTAdjust how heavy or light the Jogwheel will be19 JOGWHEELUse the jogwheel to scratch, pitch-bend or adjust the entry and exit loop positions. When VINYL mode is enabled, use the upper/inner part of the wheel to scratch the track backwards/forward and the outer part (side) to pitch-bend (temporary speed-up/slow-down tempo) When CDJ mode is enabled use any part of the jogwheel to pitch-bend (temporary speed-up/slow-down tempo) See LOOP controls for loop in/out adjust. The small LCD screen will display the Album Art of the loaded track, the CUE position and a track rotation marker20 MASTERUse this button to manually set the Deck as Master. When a Deck is set as Master, all other Decks will sync to the Master Deck, if SYNC is pressed.21 BEAT SYNCUse this button to synchronize Tempo (BPM) and Beat phase to the other Deck or Master Deck - if more than 2 Decks are used.22 KEY SYNCUse this button to match the Key of the track with the opposite Deck. Press again to reset the Track's key back to its original value.23 TEMPO RANGEUse this button to select the % range for the Pitch fader. On each press, the range will cycle through 6,10,16 and 100%. The selected range is displayed on the LCD of the unit24 MASTER TEMPOUse this button to enable/disable Master Tempo (Keylock). When enabled, pitch/tempo changes will not affect the Key of the track25 TEMPOUse this fader to adjust the tempo (BPM) of the track. In middle position, the track will play at its original tempo (BPM). The pitch% and BPM value are displayed on the LCD of the unit.26 TEMPO RESETUse this button to gradually reset Track's tempo back to its original value.27 SLIPEnable/disable Slip mode. When enabled, several actions such as holding the platter, loop and Hotcues will act temporarily and once performed, track will resume to the position it would have been if the action was never performed28 QUANTIZEEnable/disable Quantize mode. When enabled, several actions such as loops and Hotcues will be quantized (snapped) to the nearest beat or other beat fraction depending on the globalQuantize value (from VirtualDJ Settings)29 TIME MODEToggle between Elapsed and Remain Time view. Hold down for more than 1 second to enable/disable AutoCue. When enabled, tracks will loaded at the first available Hotcue position30 SDInsert a compatible SD card. This source is not used when the device is assigned to VirtualDJ31 USBInsert a compatible USB media storage device. This source is not used when the device is assigned to VirtualDJ32 USB STOPPress and hold this button to eject a USB device. This operation is not used when the device is assigned to VirtualDJ33 SOURCEUse this button to select a Source for the device. When the device is connected to a computer running VirtualDJ, select the CONTROL MODE (CDJ), then press the BROWSE rotary [41] to apply your sleection34 BROWSEUse this button to toggle between the Library/Browser and Deck view35 TAG LISTNo functionality is offered in CONTROL MODE36 PLAYISTNo functionality is offered in CONTROL MODE37 SEARCHNo functionality is offered in CONTROL MODE38 MENUPress and hold this button to enter the CDJ-3000 Utilities menu and adjust screen and jogwheel brightness. No other functionality is offered in CONTROL MODE39 BACKWhen in Browser view mode, use this button to get the Folders list view. If focus is in Folder view, use this button to open/close sub-folders (if exist)40 TAG TRACKNo VirtualDJ functionality is assigned to this button41 BROWSE ROTARYWhen in Decks view, use this rotary to zoom in/out the waveform of the loaded track. When in Browser view : Use the rotary to scroll through files or folders. Push the rotary to see the tracks of the selected folder (if in Folders view) or load the selected track to the Deck (if in Tracks list view)42 TRACK FILTERNo VirtualDJ functionality is assigned to this button43 SHORTCUTUse this button to get a screen with Shortcuts/Setting. When using VirtualDJ (CONTROL MODE) only the Brightness settings are available. No other VirtualDJ functionality is assigned to this button Display