Hardware Manuals


Novation - Launchpad Pro  

SAMPLER MODE


Press the top SESSION button, to set the device to Sampler mode (selected by default on start-up)


PADS


KEY

ACTION

SHIFT ACTION

1 to 64 PADS
Trigger * Sample 1 to 64 from the selected Sampler Bank. The led of each Pad will take the nearest available color of the Sample (as defined in Sampler Editor)

When Record Arm button (Bottom 1st) is enabled, the pad records a new sample and ads it to the same slot position in the Recording Bank
Stops the sample 1 to 64 of the selected Bank (useful when the Stutter or Un-mute trigger mode is selected)


* The Pads offer velocity. When enabled, the volume of the samples will be altered depending on how hard the pad is pressed. See further details at the Advanced Setup chapter


TOP BUTTONS


KEY

ACTION

SHIFT ACTION

T1 ARROW UP
Select previous available Sampler Bank
T2 ARROW DOWN
Select next available Sampler Bank
T3 ARROW LEFT
Halves the loop size of the selected/current sampler (when it's set in Loop mode)
T4 ARROW RIGHT
Doubles the loop size of the selected/current sampler (when it's set in Loop mode)
T5 SESSION
Selects the current Sampler mode
T6 NOTE
Selects the Effects mode mode
T7 DEVICE
Selects the Mixer mode mode
T8 USER
Selects the User's mode mode


LEFT BUTTONS


KEY

ACTION

SHIFT ACTION

L1 SHIFT
Press and hold down to access secondary actions, as described in the SHIFT ACTIONS column
L2 CLICK
Select the 'On/Off' Trigger Sampler mode.
L3 UNDO
Select the 'Hold' Trigger Sampler mode.
L4 DELETE
Select the 'Stutter' Trigger Sampler mode.
L5 QUANTIZE
Select the 'Un-Mute' Trigger Sampler mode.
L6 DUPLICATE
Not assigned
L7 DOUBLE
Not assigned.
L8 CIRCLE
Sets the selected/current sample to Loop mode


RIGHT BUTTONS


KEY

ACTION

SHIFT ACTION

R1 to R7 ARROW
Quick Bank select buttons. Select the 1st to the 7th first available Banks of Sampler. Banks (next/previous) can be selected from the Top Down/Up Arrow buttons
R8 ARROW
Select the Recordings Sampler Bank


BOTTOM BUTTONS


KEY

ACTION

SHIFT ACTION

B1 RECORD ARM
Enable Sampler Recording mode. When enabled, use Pads 1 to 64 to record a new sample to the corresponding slot of the Recordings Bank
B2 TRACK SELECT
Select the Trigger Pads view (led is bright) where Samples are shown in boxes in GUI, or the Detailed view where samples are listed along with other properties and controls, such as Volume, Loop Size and Controls, etc.
B3 MUTE
Not assigned
B4 SOLO
Not assigned.
B5 VOLUME
Press to select the Sampler Volume Controls mode (led will become bright). In this mode, the Pads control the Volumes of the Samples, as explained further.
Press again to return to the default Trigger Sampler view.
B6 PAN
Press to select the Sampler Group Volume Controls mode (led will become bright). In this mode, the Pads control the Volumes of the Groups of the selected Bank (if available), as explained further.
Press again to return to the default Trigger Sampler view.
B7 SENDS
When enabled (default - led is bright), audio signal from Sampler will be routed to the Headphones channel as well..
B8 STOP CLIP
Stops all currently playing samples.


SAMPLER VOLUME MODE


When in Sampler mode, use the VOLUME button at the bottom [B5] to set Pads to Volume Control.


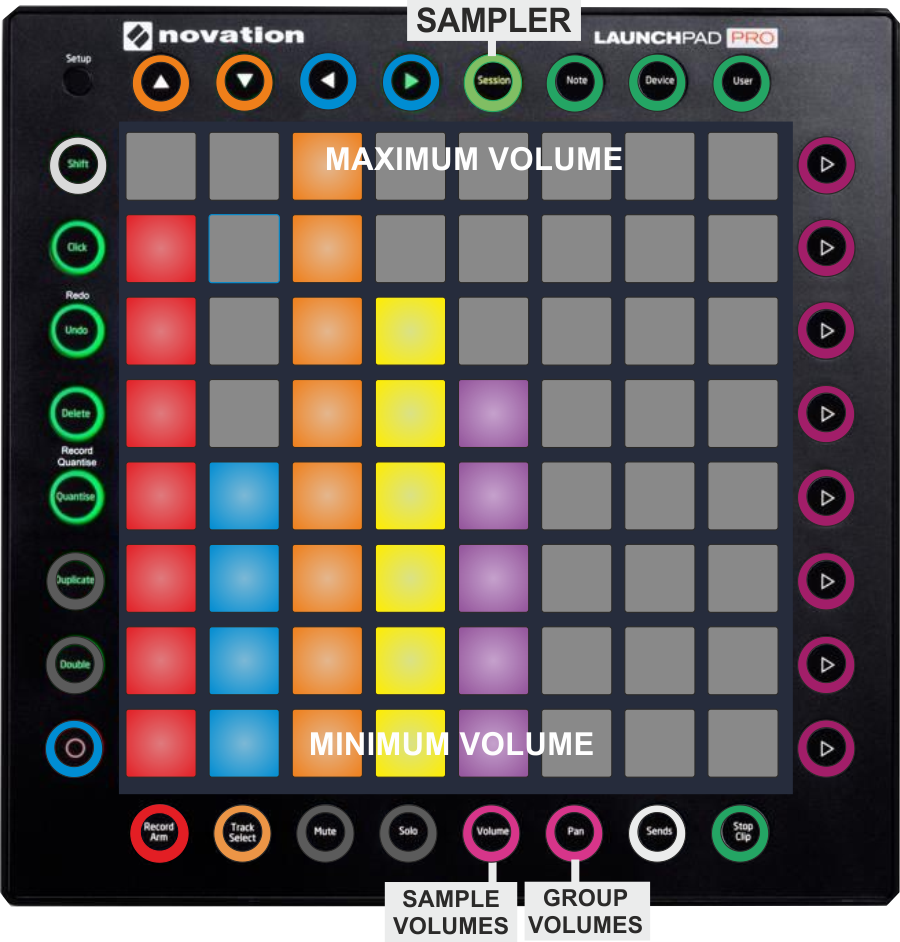
In this mode, the 8 columns of Pads adjust the Volume of the 1st to 8th sample of the selected Sampler Bank. Press a pad inside the column of the corresponding sampler slot to gradually* adjust its Volume from the minimum (zero) - when lowest pad is pressed - to the maximum (volume 100%) - when the upper pad is pressed.

* The speed that the volume will increase/decrease to the set value, depends on the velocity (how hard the pad is initially pressed).

The Colors of the Pads in the same column will automatically get the color of the sample (1 to 8).

Note that if a sample (1 to 8) is assigned to a Sampler group, adjusting its volume will also adjust the volumes of all samples that are assigned to the same group. Sampler groups are defined in Sampler Editor.
If you wish to adjust the Volume of a single sample, without affecting the volumes of the other samples in the same group, use the right-side arrow buttons (R1 to R8) to select a block of samples (1 to 8, 9 to 16 ... etc up to 57 to 64). When all right-side arrow buttons are off, the Pads in the 8 columns will adjust the volume of all samples in the same group.

When in Sampler mode, use the PAN button at the bottom [B6] to set the 64 Pads to Volume Groups Control. In this mode, the 8 columns represent the volumes of the available sampler groups in the selected Sampler bank. If no groups are defined/assigned to any sample, the pads/columns will have no functionality.

Effects Mode