


OPUS-QUAD
BROWSER & MAIN DISPLAY
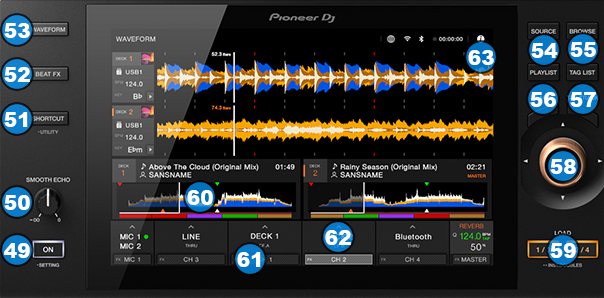
- SMOOTH ECHO: Press this button to enable a Smooth Echo effect when performing some operations on OPUS-QUAD (Hardware operation).
Hold down this button to enter a menu that you can adjust when the Smooth Echo effect will get triggered (Hardware Operation). - SMOOTH ECHO LEVEL: Adjust the amount of the Smooth Echo effect.
- SHORTCUT: Use this button to show some additional settings for Display view.
Hold this button down for more than one second to enter the unit's UTILITY menu to adjust various operations of OPUS-QUAD (Hardware operation) - BEAT FX: Use this button to show a screen where you can apply Beat Effects in various timing combined with a Filter Effect (Hardware operation)
- WAVEFORM: Use this button to return to the main view of the display, that shows the waveforms of the tracks.
- SOURCE: Press this button to select the source for a deck. You can either select to load tracks from a USB flash drive (stand alone operation) or from a software deck.
To use a deck with VirtualDJ you need to select "SOFTWARE CONTROL" and then use the LOAD buttons select and confirm that a deck is assigned to VirtualDJ. - BROWSE: Press this button to display the Browser view on the Display. Press again to return to the Main (waves/decks) view.
- BACK: Press this button to set focus to the Folders list of VirtualDJ Browser and get the Folders view on the Display. If focus is on Folders, use this button to expand/collapse sub-folders
Hold SHIFT down and then push this button to load the previous used folder in Songs view. - TAG TRACK: Press this button to add the track that's selected on the browser on the Playlist (Automix) list.
Hold SHIFT down and then press this button to add the track that's selected on the browser on the Sidelist.
Press and hold this button down for one second to open/close the File Info window on the Browser of the VirtualDJ GUI which shows additional track information. - BROWSE/ZOOM: When in Main (waves/decks) view, use this rotary to zoom the waves in/out.
When in Browser view, use this rotary to scroll through folders and tracks.
Tilt the rotary to the left or right to scroll between Folders list, Song list and Sideview List.
Tilt the rotary up or down to scroll 5 items at a time
Push the rotary in to switch focus to Song list.
Hold SHIFT down and then tilt the rotary left or right to cycle through the available lists of Sideview (Automix, Sidelist, Sampler, Karaoke and Shortcuts)
Hold SHIFT down press the rotary in, to switch focus to the Sideview. - LOAD: Use these buttons to load the selected track to either left or right deck. Fast double press these buttons to clone the other deck to the respective deck.
Please note that "PLAYLIST" and "TAG LIST" buttons don't send MIDI and they are reserved only for stand alone operation with USB flash drives.
TOUCH DISPLAY
The display of the OPUS-QUAD is not a full touchscreen, but there are a few operations offered by pressing some areas on the display.
- SONG PROGRESS WAVE : Touch and scroll though this area to seek through Track. When Track is audible, this operation is blocked by default. You can unlock this operation from VirtualDJ Settings->OPTIONS. See OPUS-QUAD Settings
- BEAT FX ASSIGN : Touch this area to select on which deck the Beat Effects of the unit will be assigned to (Hardware Operation)
- CHANNEL SOURCE / CROSSFADER ASSIGN : Touch this area to select the source of each mixer channel of OPUS-QUAD (applies only on channels 3 & 4) and their crossfader assignment (hardware operation)
- DECK INFO : Tap this area to get the Loaded Track Info view. Tap again to return to Main (waves/decks) view.
Front & Rear