


DDJ-REV5
DECK CONTROLS
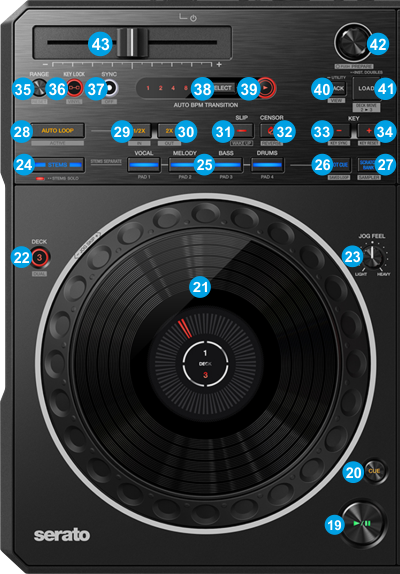
- PLAY/PAUSE. Plays / Pauses the track. Press and hold SHIFT and then press this button to "stutter-play" the track from the last set Cue Point.
- CUE. When the Deck is paused, you can set a temporary Cue Point by moving the Platter to place the Audio Pointer at the desired location and then pressing the Cue Button. During playback, you can press the Cue Button to return the track to this Cue Point. (If you did not set a Cue Point, then it will return to the beginning of the track.). If the Deck is paused, you can press and hold the Cue Button to play the track from the Temporary Cue Point. Releasing the Cue Button will return the track to the temporary Cue Point and pause it. To continue playback without returning to the Temporary Cue Point, press and hold the Cue Button, then press and hold the Play Button, and then release both buttons.
Hold down SHIFT and then press this button to return to the beginning of the track. - JOGWHEEL. Pressure sensitive platter for scratching (Vinyl Mode) , bending (CD Mode) or Loop In/Out fine-adjust.
Hold SHIFT down and then use the Jogwheel to fast-seek through the Track. - JOG FEELING ADJUST. Adjust the tension of the Jogwheel (hardware operation)
- DECK SELECT. Switch Left decks (1 and 3) and Right Decks (2 and 4). The number of the selected Left/Right Deck will be displayed on the Jog screen.
Hold SHIFT down and then press this button to enable/disable Dual Deck mode on Left or Right side. When enabled (Jog screen will show both Deck numbers active), and the following REV5 controls will apply to both Decks of the same side.
Jogwheel, Gain, EQ, Volume, Filter, Effects, Pads, Play, Cue, Loops, Keylock, Slip, Censor, Key -/+. - STEMS MODE. Select the Stems mode for the 4 Stem buttons (25). Double-press this button to toggle between Mute and Solo Stems mode
- STEM BUTTONS.
When in Stems mode, use these buttons to isolate (Solo) or mute one of the 4 Stems part of the Track (Vocal, Melody, Bass, Drums)
When in Hot Cue mode, use these buttons to trigger Hotcue 1 to 4. Hold SHIFT down and then use these buttons delete the assigned Hotcues
When in Scratch Bank mode, use these buttons to load the assigned Track from the selected Scratch Bank. Hold SHIFT and then use any of these buttons to unload the Scratch Bank Track and reload the Deck with the Track it was originally loaded
See details at https://virtualdj.com/manuals/virtualdj/interface/decks/decksadvanced/pads.html#scratchbank
When in Saved Loop mode, use these buttons to save, load or delete Loops in slots 1 to 4. See details at https://virtualdj.com/manuals/virtualdj/interface/decks/decksadvanced/pads.html#savedloops
When in Sampler mode, use these buttons to trigger Samples of slots 1 to 4 of the selected Sampler Bank. See details at https://virtualdj.com/manuals/virtualdj/interface/decks/decksadvanced/pads.html#sampler - HOTCUE MODE. Select the HotCue mode for the 4 Stem buttons (25).
Hold SHIFT down and then use this button to select the Saved Loop mode (led will blink) for the 4 Stem buttons (25) - SCRATCH BANK MODE. Select the ScratchBank mode for the 4 Stem buttons (25).
Hold SHIFT down and then use this button to select the Sampler mode (led will blink) for the 4 Stem buttons (25) - AUTOLOOP. Use this button to activate a seamless loop of the selected size in beats. If a loop is active use his button to exit the loop. The button can trigger a specific loop size. See Advanced Setup
Hold down SHIFT and press this button to activate the last triggered Loop (re-loop) - 1/2X. Use this button to half the size of the loop.
When not in loop, hold SHIFT down and then use this button to set a Loop In point (for manual looping).
When in Loop, hold SHIFT down, press this button and then use the Jogwheel to fine-adjust the Loop In point (and the size of the current loop) - 2X. Use this button to double the size of the loop.
When not in loop, hold SHIFT down and then use this button to set the Loop Out point (for manual looping).
When in loop, hold SHIFT down, press this button and then use the Jogwheel to fine-adjust the Loop Out point (and the size of the current loop) - SLIP. Enables Slip Mode. Several software functions (such as Jogwheel movements, HotCues and Loops) will apply temporary on the track, and the track will return to the position it would have been if those functions were not triggered.
- CENSOR. Press and hold this button to play the track in reverse. On release the track will resume playing from the position it would have been if the button was never pressed.
Hold SHIFT down and press this button (momentarily) to play the track in reverse. Press again to return to forward direction. - KEY -. Use this button to decrease Track's Key to by -1 semitone.
Hold SHIFT down and then use this button to match Track's key with the nearest compatible key of the other Deck. - KEY +. Use this button to increase Track's Key to by +1 semitone.
Hold SHIFT down and then use this button to resetTrack's key to its original value. - RANGE. Use this button to select the next available Tempo % range for the Tempo fader.
Hold SHIFT down and then use this button to reset Track's BPM/Tempo to its original value. - KEYLOCK. Use this button to "lock" the track's Key during Tempo changes.
Hold SHIFT down and then use this button to enable/disable Vinyl mode for the Jogwheel - SYNC. Use this button to match the corresponding Deck's tempo with the opposite Deck's (or the Master Deck’s if using a 4 decks Skin) tempo. When Deck is playing, beat-phase will be also synced.
Hold SHIFT down and then use this button to enable Beat-Lock . When enabled, Deck will be kept synchronized with the opposite Deck even if Tempo is changed or during scratching. - ABT SELECT. Hold down this button and then use the (momentary flashing) buttons AUTOLOOP, KEYLOCK and the 4 STEM buttons, to enable/disable the available options for the Auto-BPM-Transition.
Hold SHIFT down and then use this button to select the duration (in bars) of the Auto-BPM-Transition. The selected value will be shown in the small display. - ABT ON. Use this button to start the Auto-BPM-Transition. During the Transition the Tempo of the Deck will gradually change to match the BPM of the other Deck. Press again to end the Auto Transition.
Hold SHIFT down and then use this button to start the Auto-BPM-Transition but with the opposite Deck to gradually change its BPM value to match the first Deck.
- BACK. Press this button to set focus to the Folders list. If focus is on Folders list, use this button to expand/collapse sub-folders.
Hold down SHIFT and press this button to cycle though the available Sideview lists (Automix, Sidelist, Karaoke, Sampler, Clone and Shortcuts) - LOAD. Press this button to load the selected Track from Browser to the Deck.
Double-press the same button to clone the Track from the other Deck to this Deck.
DECK MOVE: Hold down SHIFT and press this button to move its Track to the other side and unload this Deck. The Deck of the other side depends on the Left/Right selected Deck.
When Deck 1/Deck 2 is set as Left/Right Decks, the Track will be moved to Deck 3/ Deck 4 respectively.
When Deck 3/Deck 4 is set as Left/Right Decks, the Track will be moved to Deck 1/ Deck 2 respectively. - BROWSE.
Turn: Scrolls through files or folders.
Hold SHIFT down and turn the encoder to scroll through the files of the sideview
Push: Toggles focus between the Folders and the Songs list.
Hold down ]SHIFT and push the encoder to add the selected Track(s) from the Songs list to the current Playlist of the Automix list. - TEMPO. Controls the track's playback tempo.
Rear